Magento 2 – How To Get Product Collection?

Today we will learn very interesting things. which is getting product collection with two ways, Let’s see how they work.

With Dependency Injection:

We will get the list of products in our Magento 2 store using Dependency Injection. First, we need to inject the object of \Magento\Catalog\Model\ResourceModel\Product\CollectionFactory class in the constructor of your module’s block class and then access it from template file “.phtml“.
Sample file path you will use is app/code/Webiators/CustomChanges/Block/Product.php

Now, we will create PHTML file and call Block functions. let’s take a look

With Object Manager:

Now, let’s see how can we call Product collection with Object Manager method.

that’s 2 methods to get product collection in Magento 2. I hope that they are simple enough for you to follow. Thanks for reading!

How To Create A New Category In Magento2?

Categories are classes or things which are related, and have some shared characteristics. The following steps describe how to add categories for the products in Magento.

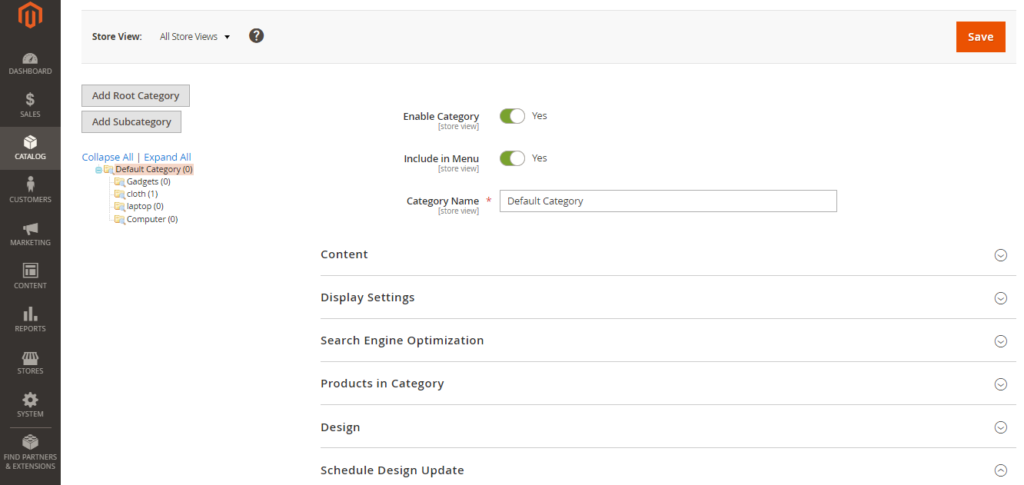
Step 1 − Login to your Magento Admin Panel.

Step 2 − Go to the Catalog menu and click on the Categories option.

Step 3 – Complete the Basic Information.

1. If you want the category to be immediately available in the store, set Enable Category to Yes.

2. To include the category in the top navigation, set Include in Menu to Yes.

3. Enter the Category Name.

4.Click Save and continue.

Step 4 – Complete the Category Content.

1. Expand  the Content section.

2. To display a Category Image at the top of the page, you can either upload your own image or use an image that already exists in your Media Storage.

  • To upload your own image, click Upload. Then, choose the image that you want to represent the category.
  • To use images from your  Media Storage , click Select from Gallery. Then, select the image you want to represent the category.

3. In the Description box, enter the text that you want to appear on the category landing page. Then, format the text as needed.

4. To include a content block on the category landing page, choose the CMS Block that you want to appear.

5. Click Save and continue.

Step 5 – Complete the Display Settings.

1. Expand  the Display Settings section.

2. Set Display Mode to one of the following:

  • Products Only
  • Static Block Only
  • Static Block and Products

3. If you want the category page to include the “Filter by Attribute” section of layered navigation, set Anchor to Yes.

4. To change the Available Product Listing Sort By options, do the following:

  • Clear the Use All checkbox.
  • Select one or more of the available values to be available for customers to sort the list. By default, all available values are included. For example, the values might include:
  • Position
  • Product Name
  • Price

5. To set the default sort order for the category, choose the Default Product Listing Sort By value.

6. To change the default layered navigation setting, do the following:

  • Clear the Use Config Settings checkbox.
  • Enter the value to be used as an incremental price step for layered navigation.

7. Click Save and continue.

Step 6 – Complete the Search Engine Optimization Settings.

1. Expand  the Search Engine Optimization Settings section.

2. Complete the following meta data for the category:

  • Meta Title
  • Meta Keywords
  • Meta Description

3. Click Save and continue.

Step 7 – Choose the Products in Category.

  • Expand  the Products in Category section. Then, use one of the following methods to add products to the category.
  • Use the filters as needed to find the products.To display all records that are not yet included in the category, set the record chooser in the first column to `No and click Search.
  • In the first column, select the checkbox for each product to include in the category.

4. Click Save and continue.

Step 8 – Set Category Permissions.

1. Expand  the Category Permissions section. Then, do the following:

  • For a multisite installation, choose the Website where the category permissions apply.
  • Choose the Customer Group or Shared Catalog where the category permissions apply.
  • Set the following permissions as needed:
  • Browsing Category
  • Display Product Prices
  • Add to Cart

2. To add another permission rule, click New Permission. Then repeat the process.

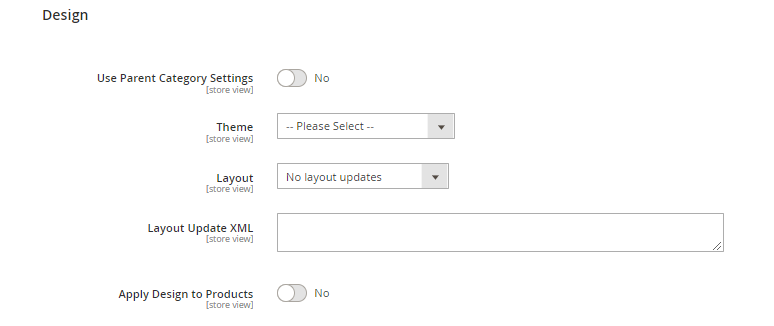
Step 9 – Complete the Design Settings.

1. Expand  the Design section. Then, do the following:

  • To change the design of the category pages, choose the Theme that you want to apply.
  • To change the column layout of the category pages, choose the Layout that you want to apply.
  • To enter custom code, enter valid XML code in the Layout Update XML box.
  • To use the same design for product pages, set Apply Design to Products to Yes.

2. When complete, click Save.

Know Every Thing About Magento 2.3.4 Release Note

Magento is the most popular ecommerce platform for many reasons among B2B and B2C type. Due to its reliability and scalability, it has advanced as a perfect solution for many ecommerce businesses. 

Magento has released the Major upgrades of its next version , and here you can know everything about Magento 2.3.4 features and improvements have been included with this upgrade. 

Magento Open source, formerly known as Community Edition and Magento Commerce, formerly known as Enterprise Edition, has significant platform upgrades and security changes. Also, it is more compatible with the PSD2 – compliant core payment methods.

As per the Release Note of Magento 2.3.4 published on Magento website, this version upgrade includes more than 220 functional fixes of the core product and more than 30 enhanced security updates. Magento has resolved more than 275 contributions made by its enriching community members like agencies and developers. Magneto did minor core code clean-up to major performance enhancement to inventory management and GraphQL.

So, let’s get into what new features and improvements are available in Magento 2.3.4

What things Magento 2.3.4 upgrade covers:

Performance boosts:

Merchants and customers will see performance improvements as a result of these enhancements:

  • Redundant non-cached requests to the server on catalog pages have been eliminated by refactoring the customer section invalidation mechanism and improving banner cache logic.
  • PHTML files have been refactored to better support parsing by the bundling mechanism. Our new bundling mechanism now identifies all dependencies on JavaScript.
  • Added the ability to disable statistic collecting for Reports module by default. A new configuration setting (System Configuration > General > Reports > General Options) allows merchants to completely or partially disable Magento Reports. (Statistics collection for the Reports module is disabled by default. Magento recommends disabling Reports functionality for performance reasons when this capability is not required.)

GraphQL functionality:

Magneto, with the release of this version, includes better Graph coverage for search, cart functionality, and layered navigation. It has below listed mutations,

  • Ability to link and retrieve cart on different devices.
  • Product tax and level discount information issue is fixed.
  • Now it is easy for GraphQL users to do price rendering which can be achieved on the storefront with the improved method of returning price.
  • Now users can get the category data by name, slug, or ID.
  • The cart now has promotion data.

Infrastructure Improvements:

Magneto has improved more than 250 core quality fixes that will boost the quality of the framework , sales, import, PayPal, catalog, Elasticsearch, CMS, and B2B.

Merchant tool enhancements:

Magento has integrated a new bundled Adobe stock integration extension that can add videos and high-quality images to the merchant’s website.

Inventory Management:

The following improvements have been made to boost the performance of inventory management.

  • A known issue involving the shopping cart has been addressed, which causes a higher load on database servers.
  • Quality issues related to credit memos, grouped product, source, and stock mass actions have been resolved.
  • Updated and improved the command for inventory Reservation CLI to lower the memory usage.

dotdigital:

Live Chat powered by dotdigital enables merchants to increase conversion rates, and keep customers coming back with real-time engagement. All Magento 2.3.x merchants can receive a free live chat agent.

These expressive improvements are available with its latest version upgrade, which is Magento 2.3.4. To know what other fixes Magento has brought, read this official Magento release note for Magneto 2.3.4.

The Pre-release date is set as Jan 14, 2020, and the Public Availability Date is set as Jan 28, 2020. But Magento Commerce customers are able to get the access before two weeks of fixed GA date for 2.3.x and 2.2.x patches. Read more about this official release note of Magento 2.3.4 for Magento Commerce.

If you want to get help from experts to update your store to the latest version?

Webiators can InstallMaintainMigrate or Upgrade your Magento Store! Visit HereCONTACT US NOW

Magento 2: Override A phtml File Using A Custom Module

Customizing the core Magento 2 functionality is a bad coding practice. The solution is to override a phtml file using a custom module in Magento 2.

Methods to Override a phtml file using a custom module in Magento 2:

1. Create registration.php file in app\code\[Webiators]\[HelloMagento]\

2. Create module.xml file in app\code\[ Webiators ]\[HelloMagento]\etc

Method 1: Override a phtml file using a custom module in Magento 2 with plugin

In this method, we use the method to create plugin in Magento 2

Method 2: Override a phtml file using a custom module in Magento 2 with xml

The steps I mention above is the shortest process for you to Override a Template File in Magento 2. With this guide, you can manage the Template File in Magento 2 easily. Every store has a Template File in Magento 2 with many attributes.

Thank you !

How To Create A Simple Hello World Module In Magento 2?

In the blog we will discuss the topic of how to create a simple Hello World module in Magento 2 in order to help you have the clearest and easiest way to create now.
We’re going to build a very simple module in Magento 2. When finished, the module’s output will say “Hello world!” in the block content on a custom frontend route.
To create Hello World module, you need to follow the following steps for Magento 2 Module Development:
step 1: Create the folder of Hello World module
step 2: Create etc/module.xml file
step 3: Create etc/registration.php file
step 4: Enable the module

Step 1: Create the folder of Hello World module

Module names in magento2 are divided into two part “VendorName_ModuleName”
e.g Magento_Search, Magento_Catalog or Webiators_Test
first part is the vendor and second part is the actual module.

Let’s take our module name to be “Webiators_HelloWorld”. First we need Focus on following guide to create the folders:
app/code/Webiators/HelloWorld

Step 2: Create etc/module.xml file

Next we need to create etc folder and add the module.xml file

app/code/Webiators/HelloWorld/etc/module.xml
Contents would be:

Step 3: Create etc/registration.php file

Next we need to Create etc/registration.php file
In this step, we will add registration.php as following guide:

app/code/Webiators/HelloWorld/registration.php
Contents would be:

Step 4: Enable the module

Finish the step 3, we have already created the HelloWorld module. And we will enable this module in this step

After create the module if you run the command as:

php bin/magento module:status
You should see the module is disable now:

List of disabled modules: Webiators _HelloWorld

Follow exact guide to enable the module right now, let run the command as:

php bin/magento module:enable Webiators _HelloWorld
Or other way, you can access the file:

app/etc/config.php
You will see a long list of modules there, just add your module as well


‘ Webiators _HelloWorld’ => 1,

Your module should be available now.

After this step, when you open your website in browser you will get an error saying

Please upgrade your database: Run bin/magento setup:upgrade from the Magento root directory.

Let run the command:

php bin/magento setup:upgrade

After complete,when you open your website in browser you will see the layout of the website is broken.

Please run the deloy command line to fix it.

php bin/magento setup:static-content:deploy
After deploy completed, you can also see your module from backend at System Configuration -> Advanced -> Disable Modules Output.

Now, we will create a controller to test module.

Before create a controller, we will create a route for HelloWorld module.

Route’s in magento are divided into 3 parts: Route frontname, controller and action as following example:

http:// Webiators .com/index.php/frontname/controller/action
To add route, it is necessary to create routes.xml file

app/code/Webiators/HelloWorld/etc/frontend/routes.xml

since this is a frontend route, we added it in frontend/ folder else we need to add it to adminhtml/ folder

Content would be:

After defining the first part of the route, the URL will be displayed as:

http:///helloworld/*
E.g: http://localhost/helloworld/*

Then, we will continue to create the controller and action

The folder and file you need to create is:

app/code/ Webiators /HelloWorld/Controller/Index/Test.php

Contents would be:

After completed, please run php bin/magento cache:clean to check result.

Your URL now should be as:

http:///helloworld/index/test
After finish all steps, the output Hello World should be displayed in your browser when you open the URL. We hope our guide is very useful and effective for you. Any questions, feel free to leave a comment below.